DevOps: Continuous Deployment with Visual Studio Team Services and Docker
It has been several years since Microsoft stepped into the cloud game with their Azure offering. Although competitors already had mature Infrastructure-as-a-Service (IaaS) ecosystems like Amazon Web Services (AWS), Microsoft placed an initial bet on a more flexible model known as Platform-as-a-Service (PaaS). Companies have realized the benefits of PaaS by leveraging services like web roles and flexible storage to scale infrastructure up and down while taking advantage of the built-in resiliency provided by Azure. Unfortunately, PaaS necessitates tight coupling between the technology solution and the cloud provider, so many companies, which either use different technology stacks or simply don’t have the desire to “put their eggs in one basket”, have remained focused on hybrid IaaS solutions instead.
Enter Containers
Recently, the cloud marketspace has been disrupted by a rapidly growing technology known as “containers.” The most popular container brand is Docker; a company that began by providing productivity tools to developers to manage their environments. The team at Docker quickly realized the benefit wasn’t in their initial PaaS cloud solution for developers, but rather the container technology itself. They released Docker as an open source project in 2013. Only three years later they partnered with Microsoft to bring Docker clients to Windows machines and provide Windows-based Docker hosts.
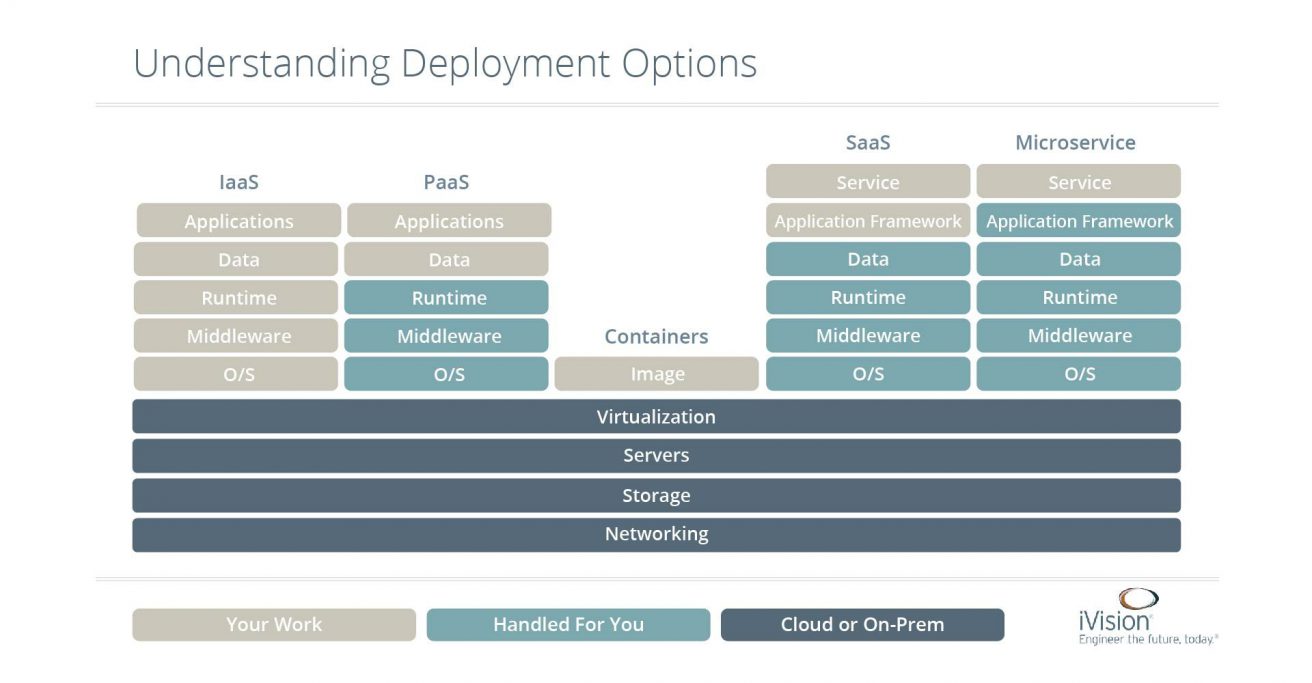
Think of containers as a compromise between IaaS and PaaS solutions. The following diagram looks at various cloud-based workloads from the perspective of ownership.
Understanding Deployment Options
| SaaS | Microservice | |||
| IaaS | PaaS | Services | Service | |
| Applications | Applications | Application Framework | Application Framework | |
| Data | Data | Data | Data | |
| Runtime | Runtime | Runtime | Runtime | |
| Middleware | Middleware | Containers | Middleware | Middleware |
| O/S | O/S | Image | O/S | O/S |
| Virtualization |
| Servers |
| Storage |
| Networking |
| Your Work | Handled for You | Cloud or On-Prem |
IaaS, for example, requires operations to patch the underlying operating system, keep middleware up to date, ensure a working runtime and then deploy and manage applications and data on top of that. PaaS takes care of everything but the application-specific code and storage itself (although storage may be provided as a service, too). However, PaaS also requires you to build code to the PaaS host. An application built to run as an Azure web app traditionally would not be easy to port to host on an AWS node. Containers provide a “best of both worlds” solution by providing a standard way to create an “image” that contains all of the working code, runtime, and even local storage needed to execute a workload.
The Problem
In the traditional development model, the team tracks code. After software is ready for QA, a “build” will create a set of binaries that are then distributed to an existing environment. Sometimes this causes issues when dependent libraries don’t exist on the target machines. A worse scenario unfolds when the code passes QA, is deployed into production, and inconsistencies between the environments cause the application to crash or perform poorly.
Why Containers Work
Containers avoid this dilemma because the container is completely self-contained. It is a portable image and that runs consistently regardless of the host. Containers can be deployed to Amazon, Google, Microsoft, or other third-party clouds, and more importantly they can be run locally on developer machines. In traditional N-Tier applications, containers can dramatically improve developer productivity by providing multiple tiers “out of the box” so the programmer can focus on source code only in the tier they are concerned with. Self-contained services, otherwise known as microservices, are ideal for containerization.
Multiple containers can run on a shared host. They share core services such as the kernel, but are isolated in terms of code processes and storage. Containers cannot write to or directly interact with other containers and are isolated from external access unless ports are explicitly opened to map access. Because containers rely on an already running host, they can be spun up quickly. They start up and tear down faster than virtual machines, and, because container images are typically only hundreds of megabytes in size, can be managed by repositories. Virtual Machines, on the other hand, may require gigabytes of storage just to share the images.
Containers already have wide adoption in development workflows, but I predict they’ll rapidly become mainstream components of modern day production applications in the coming year. All of the major cloud providers have services that don’t only run containers, but help to orchestrate them. Orchestration deals with how containers interact or how you might cluster containers. Imagine having a zero-downtime website because when you have an upgrade, you can upgrade a node in a cluster, verify its health, then upgrade the other nodes simply by swapping them out to the new containers. If a container crashes, the orchestration tool can simply spin up a new container to take its place!
Let’s See Some Examples of Containers
To see containers in action I took an Angular 2 project written with TypeScript and built a continuous deployment pipeline using Microsoft’s Visual Studio Team Services. If you haven’t looked into Team Services yet, you owe it serious consideration. Microsoft has been hard at work adding features over the past few years to create a robust, powerful, open source friendly tool that handles all aspects of DevOps. Team Services will handle everything from requirements gathering, Agile development, testing, to automated builds, testing, and deployment. The reference app for this post is a simple health app that computes various metrics like target heart rate based on the user’s age, gender, height, and weight. You can view the repository at:
https://github.com/JeremyLikness/Angular2ReduxKendoUIHealthApp
The running version is available at:
https://jrldocker.cloudapp.net:8111
When you open the web page, you should see something like this:

The graph updates as you change parameters. To build the application, I used Microsoft’s free, cross-platform Visual Studio Code IDE. Although it is a pure front-end web app that uses TypeScript, all of the 60+ unit tests can be run as part of the build process by leveraging a “headless browser” called PhantomJS. You can learn more details on how the app was built at the repository; next you will learn how I used Docker, Visual Studio Team Services (VSTS), and Azure to create an automated deployment pipeline.
The Code Build
Although the code is hosted by GitHub, VSTS provides hooks to integrate with the system. The first thing I did after creating a VSTS project to host my DevOps workflows was to create the connection to GitHub. Under configuration services for the project, there is a “services” tab. I can request a new service endpoint and choose GitHub (among many other pre-built options):

Once selected, you can grant authorization through the web interface or specify a personal access token that you generate from the GitHub site. That’s all it takes to form the connection.
Under the “build and release” tab I created a new build from the empty template and chose GitHub as my repository. The service connection allowed me to navigate to the GitHub project and checking “Continuous Integration” ensured the build will be triggered any time I push a commit to master.

If you’ve never worked with VSTS for creating builds before, it is a fairly straightforward “drag and drop” process. Under the “build” tab I created four steps:

Configuring a step is as simple as filling out some parameters. Here is the step to install the Angular Command Line Interface (Angular-CLI) so that I can use it to build the Angular app:

The command line to execute tests uses the tool to build and run the tests using the headless browser. If the tests all pass, control will pass to the next build step, which is a production build that uses Webpack to create an optimized bundle for production. After it is all done, I also added a “Copy Publish Artifact” build step to bundle up the contents of the “dist” directory that contains the compiled output from building the project. This allows me to inspect the result of the build in case there are issues down the road.
Pro tip: the application I created relies on a third-party library from a company called Telerik named Kendo UI for Angular 2. Because this is served from a private repository, it requires a login with credentials. Obviously, logging in every time isn’t practical for an automated build. To solve this, I logged in locally on my machine to generate an .npmrc file that contains an authentication token. I was able to copy the contents of the file to a global npmrc on my build machine, then delete the file locally. Now the build machine can authenticate using the same token. I could also set up the authorization token as a build variable and pass it in to a step that writes out a local .npmrc as part of the build.
Up to this point, the build is a fairly traditional build. It will fail if the tests fail, so we have both continuous integration and automated testing. The build, as defined, will also run equally fine on a Linux or Windows-based machine provided the prerequisites such as Node.js and PhantomJS are installed. For this reason, I was able to use the built-in VSTS “hosted” agent at first to run my builds in the cloud. However, the next step on a successful build is to build and publish a Docker image, so I needed my own machine to host Docker.
The Build Agent
Creating a machine to host the build was fairly straightforward. In this simple example the same machine builds and runs the Docker container. In a production scenario these would be different machines or perhaps entirely different services such as Azure Container Service. The Azure Portal makes it almost too easy to provision the right machine. A quick search led me to “Docker on Ubuntu Server”:

I chose a bare minimum image (DS1_v2 with 1 Core, 3.5 GB of memory, a few gigabytes of disk space) and it spun up everything I needed using the associated Azure Resource Management templates (ARM). This is “Infrastructure as Code” and allows you to script an entire environment including nodes, networks, and interdependencies. This is the snapshot of the resources that were generated:

Now I had to hang up my Windows, .NET Developer hat and switch to command line Linux mode. I built my first Linux server on a desktop in my apartment in 1992, and believe it or not my memory is still good enough to draw on those skills. Of course, Linux today is a lot different … but then again, a command line is still a command line. The next steps in order were:
- SSH to the machine. Because I have Git on my Windows laptop, I simply used the included Git-Bash tool which provides a Linux-like command line.
- The VSTS agent requires .NET Core, a cross-platform runtime based on the .NET Framework. I followed the instructions here to install .NET Core on my Linux machine:
https://nas/content/live/ivisionstaging.microsoft.com/net/core#linuxubuntu - My build process uses Node and NPM, so I installed both.
- I also installed PhantomJS.
- In the VSTS web console, under “configuration”, there is a tab for “Agent queues” that provides a “Download agent” link. Tapping on Linux, then Ubuntu 16.04 gave me the exact instructions I needed to download and run the agent. I created a new pool called “Linux” for this.
- I linked the agent to my account using a personal access token (PAT) and let the agent auto-register.
Within seconds the machine was registered in my agent pool and I was able to kick-off and successfully run builds:

Now that I could automate the build, ensure that tests were passing, and ensure the right artifacts were generated, it was time to move the build into a new phase. On a successful build, I no longer wish to deal with source code or deploying binaries. Instead, I want a stable, working image that I can promote to whatever environment is needed. Time to build the container!
The Container Build
I chose to use the free repository Docker provides by signing up at https://hub.docker.com/. This enables you to check in images with different versions and pull them down to machines to run. If you are already familiar with Docker and have a Linux host, you can run the latest version of my app right now:
docker run –name webapp -d -p 80:80 jlikness/ng2kendouireduxapp
Then access it on https://localhost.
VSTS provides a set of preview Docker extensions for integrating Docker steps into the build. Once I had these installed to my VSTS instance, I was able to go into the “Services” tab and add a Docker Hub registry entry.

I added two new build steps. The first to build an image using a Dockerfile I created that packages the Angular files in a container running the open source nginx web server.

The next step pushes the image to my registry. This registers a version of the image that can later be pulled down to run. What’s unique about having a container registry is that if you need to troubleshoot a prior version of the code, instead of building from old source, you simply pull the right version of the container to debug.

This completed my configuration for Continuous Integration: building, testing, and generating a stable image as well as artifacts I can browse in VSTS. Next stop: deploying!
The Cloud Deployment
VSTS separates the build and deployment process by providing “build” and “release management.” For release management, I created a new definition titled “Run Docker Image.” This definition has one environment. When triggered, it executes three tasks. The first two tasks simply stop any running version of the app and remove the old image. The third task runs the latest image.

I will use the same Docker host to run multiple apps, so I decided to map the web port to a unique number (8111). This is what the run definition looks like:

The deployment is triggered by successful completion of the continuous build. This means it will not automatically deploy if any tests fail or for some reason the creation and publication of the container image fails.

That’s it! In this simple case, the successful build triggers the deployment and the result is the updated application running on my website. As part of the Azure configuration, I allow access to port 8111 to access the running app: https://jrldocker.cloudapp.net:8111. My dashboard can show me the result of builds (notice the failed builds as I was working out dependencies on my build environment) and the health of my environments:

Conclusion
The result of the VSTS configuration is a workflow that looks like this:
- Commit a change to GitHub
- GitHub notifies VSTS
- VSTS triggers a build
- The VSTS agent pulls down the source, builds the app, and runs the tests
- If the tests pass, the production build is run, compiled into an image, and published to my Docker registry.
- If the build passes, the release management definition is triggered.
- Release management stops any existing runs, pulls the latest image and runs it
I built this integration while I was about 70% through building the app, so I could enjoy making the final commits and watching the website update “automatically” a few minutes later. The whole image is only 74 MB and I can see the history in my Docker account:

Although this solution demonstrates a full deployment pipeline, there are two very important things missing. First, the website will go down for a fraction of a second when the old image is stopped and the new one is pulled and ran. In many sites, this is not acceptable. The solution would be to use an orchestration tool like Docker Swarm, Kubernetes, Azure Container Services, etc. to manage at least two container images behind a load balancer. On updates, first one, then the other container can be swapped out, resulting in zero downtime.
The second missing factor is multiple environments. An ideal pipeline would run the Docker image in a QA environment first. QA would manually accept a build, causing it to deploy to staging where automated load tests are run before finally pushing it to production (for an excellent overview of load-testing capabilities, read Kevin Tuttle’s Web Performance Testing series).
There is no doubt that containers are disrupting IT departments around the world. I expect that 2017 will bring more production-based container deployments. These deployments will provide relief for organizations that want the lower overhead and costs associated with containers vs. virtual machines but want to leverage hybrid solutions without settling on vendor-specific PaaS implementations. At ivision we are containerizing our internal workloads as we move more of our own resources out of the premises and into the cloud.