
SOLID Principles | Building a Visual Studio Console App
SOLID Principles: Part 1
The SOLID principles (Single Responsibility, Open-Closed, Liskov Substitution, Interface Segregation, and Dependency Inversion), are a set of core object-oriented design principles created by Robert C. Martin. The basic idea behind the inception of these principles is that developers who apply them will end up with code that is easier to extend and maintain over time. In this post, I will cover the basic use of these principles, however if you are interested in some more advanced concepts that use these principles, I would recommend reading this article by Martin Fowler on Microservices.
Developing a Console Application with Visual Studio
To demonstrate how each principle can be used, I’ll give an explanation of each principle and walk through developing a simple console application using Visual Studio 2015 as the development tool and C# as the programming language of choice. As a reference, this post uses the solution from my previous blog post on test-driven development as a starting point, so I would recommend reading that first before continuing with this post.
The first principle, single responsibility, simply states that “a class should only have one reason to change” meaning it should only have a single responsibility. Looking at the area calculator class from my previous blog post, it currently has the responsibly of returning the area of an object. To verify that it only has this as a single responsibility, you can answer the question “what reason does it have to change?” In this solution, the only reason for change logically is the shape, so we can conclude that it does follows the single responsibility principle.
Now what if the solution also needed to get both the area and perimeter of an object? If the code for this calculation were added to the same class, it would no longer follow the single responsibility principle since the reasons for it to change would now be the type of calculation performed and the shape that the calculation is made for. So to follow this principle, these responsibilities should be handled by separate classes. In the current solution this is pretty easy to implement as most of the code can be copied from the area calculator class, only requiring changes to the formulas and expected number of parameters for each shape. Below is the resulting class for the perimeter calculation:

To run this code in a practical use, we can build a console application for this solution. To add a console application to the solution, right click the solution in the solution explorer, select Add-> New Project, then select “Console Application” from the list. For this example, I just named it “Calculator”.
Inside of the Calculator project, a reference to the CalculateArea project will need to be added, and a using directive for the CalculateArea namespace will need to be added to the Program.cs code so the methods for the perimeter and area calculations can be called. (Note: in my example, the area calculator and perimeter calculator classes are both in the CalculateArea namespace.)
Now inside the main method, a local instance of each calculator class will need to be created to call their methods. The following code snippet is how this is done in my example:

Next, logic will need to be added to determine whether the correct number of arguments are passed into the program. For the calculations to run, 3 arguments are required: the type of calculation we want to preform, the shape the calculation is being made for, and the list of parameters needed to make the calculation. The following code snippet can be used to do that:

Since exactly three arguments are expected, an exception will be thrown if three arguments are not passed. I also added a message to my exception to show the correct usage for the program.
For the parameters, it is setup for these to be input as comma separated values (csv). Note that when running the program, multiple parameters need to be contained within quotes to be recognized as a single argument. As csv’s, the parameters can be split into an int array to be used in the area and perimeter calculators:
![]()
Now a switch is needed to determine which type of calculation will be made based on the first argument, then the shape and parameters will be passed into the calculators:

Since the application will be run from the console, Console.WriteLine is used to output the results to the console. An exception is also thrown if an invalid calculation type is used.
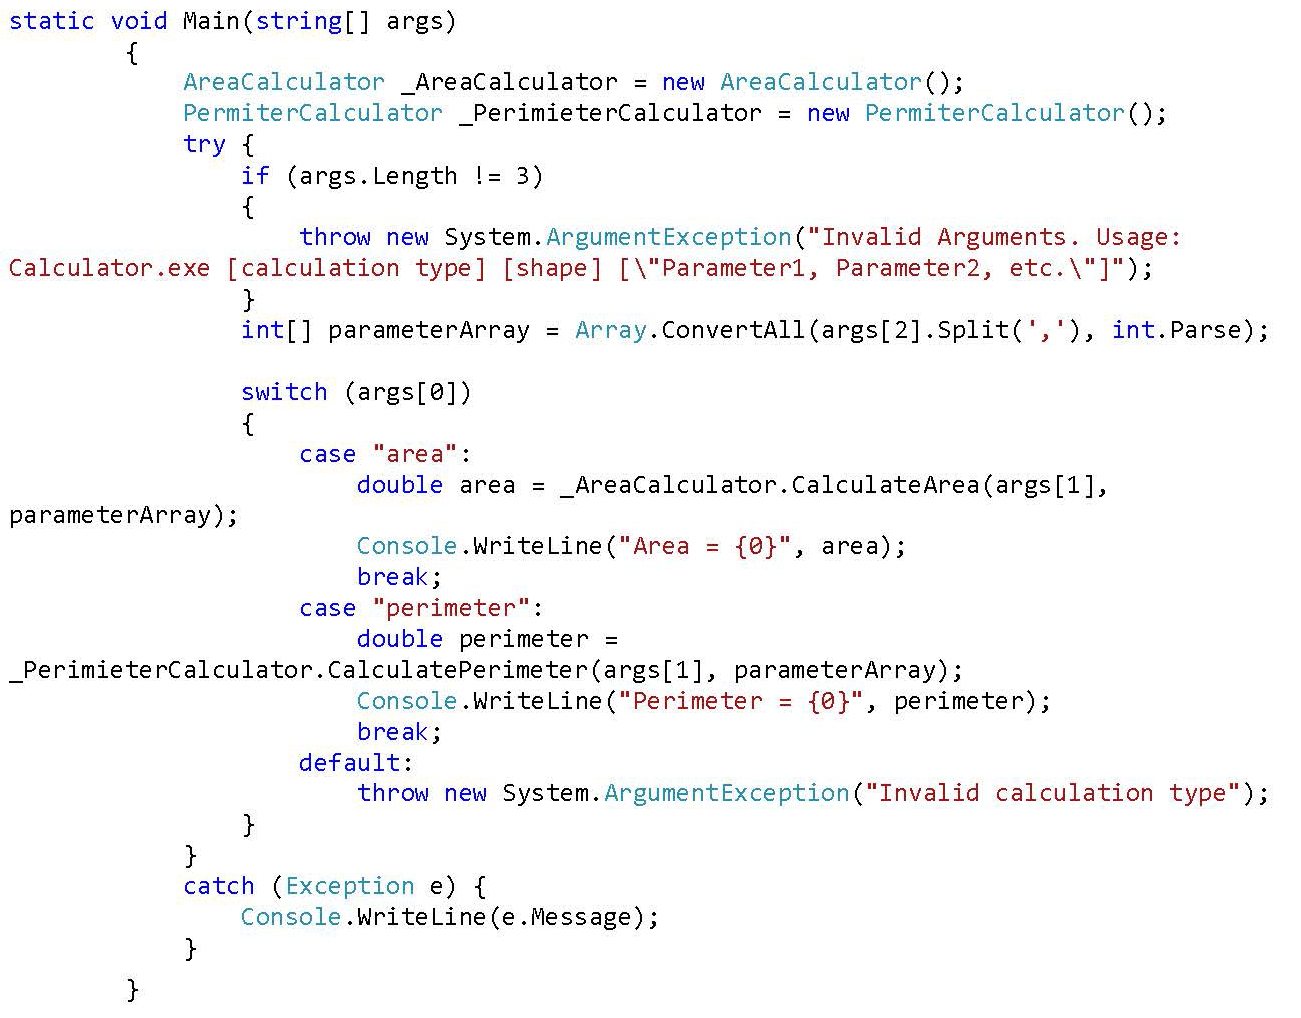
Lastly before compiling and running the program, the logic inside the main method will need to be wrapped in a try-catch statement to handle the various exceptions configured within the solution. Below is the resulting main method:

If any exceptions are thrown in the program, they will now be caught and the message will be output to the console (Note that typically the exception would be re-thrown, however for this solution we just needed to output the exception message to the console.).
Using Arguments in Visual Studio Console Application
Next the solution can be built and an exe for the console program will be created in the output path specified in the build. Now you can simply open a command prompt and run the exe to see how the program works when using various arguments:


You can see that program functions as intended, but does the new program class follow the single responsibility principle? I will let you try to answer that one on your own, and see if you can try updating the project to follow this principle if it does not already.
I will include the answer in the next part of this series where I will begin to cover the remaining SOLID principles, and show how they can be used in this solution.
I hope you found this post useful and be sure to check back for part 2. Also visit our website to learn more about our Application Development practice at ivision, and fill out our contact form if you would like to keep in touch.